-
[NeRF 기본] 볼륨 렌더링 기본 (An Introduction to Volume Rendering)NeRF 2023. 8. 5. 01:10
작성중
* Volume Rendering for Developers: Foundations 를 참조하여 작성되었습니다.
Lesson: to learn how to render a volume shaped like a sphere illuminated by a single light source on a uniformly colored background.
Internal Transmittance, Absorption, Particle Density, and the Beear's Law
우리 눈에 들어오는 빛은 어떤 물체에 반사된 빛이거나 광원에서 발산된 빛이다. 빛이 입자들로 이루어진 공간(Volume)을 통과할 때 입자에 흡수된다. 공간상에 입자가 많을 수록 볼륨이 더욱 불투명해진다. 이러한 단순한 관찰을 통해 우리는 볼륨 렌더링의 기초적인 개념을 만들 수 있다: 흡수, 투과율, 볼륨의 투명도와 입자의 밀도간의 상관관계. 이제부터 우리는 공간 안에서는 입자의 밀도가 균일하다고 가정할 것이다.
Light reaching our eyes as a result of light being reflected by an object or being emitted by a light source is likely to be absorbed as it travels through a volume of space filled up with some particles. The more particles we have in the volume, the more opaque the volume. From this simple observation, we can lay down some fundamental concepts related to volume rendering: absorption, transmission, and the relationship between how opaque a volume is and the density of particles it contains. For now, we will consider that the density of particles contained by the volume is uniform.빛이 볼륨을 통과할 때, 일부는 흡수(absorption)된다. 우리가 지금부터 살펴볼 부분은 내부 투과율로 이는 빛이 볼륨을 투과하는 정도를 말한다. 내부 투과율은 0에서 1 사이의 값으로, 0은 볼륨이 모든 빛을 차단하고 1은 모든 빛이 전달됨을 의미한다.
As light travels through the volume in the direction of our eye (which is how images of objects we are seeing are formed in our eye), some of it will be absorbed by the volume as it passes through it. This phenomenon is called absorption. What we are interested in (for now) is the amount of light that's being transmitted from the background through the volume. We speak of internal transmittance (the amount of light being absorbed by the volume as it travels through it). Internal transmittance can be seen as a value going from 0 (the volume blocks all light) to 1 (well, it's a vacuum so all light is transmitted).볼륨을 투과하는 빛의 양은 Beer-Lambert 법칙에 의해 결정된다. Beer-Lambert 법칙에서 밀도 개념은 흡수 계수로 표현된다. 즉, "볼륨이 더 조밀할수록 흡수 계수가 더 크다"고 말할 수 있다. 즉, 흡수 계수가 증가함에 따라 볼륨은 더 불투명해진다. Beer-Lambert 법칙의 방정식은 다음과 같다.
The amount of light that's being transmitted through that volume is governed by the Beer-Lambert law (or Beer's law for short). In the Beer-Lambert law, the concept of density is expressed in terms of the absorption coefficient (and scattering coefficient but we will introduce the scattering coefficient later in this chapter). Which you can understand as, "the denser the volume, the higher the absorption coefficient"; and as you can guess intuitively, the volume gets more opaque as the absorption coefficient increases. The Beer-Lambert law equation looks like this:$$T = exp(-distance * \sigma_{a}) = e^{(-distance * \sigma_{a})}$$
Beer-Lambert 법칙에 따라 빛이 볼륨을 통과할 때 내부 투과율(T)과 볼륨의 흡수 계수($\sigma_{a}$)와 빛이 물질을 통과하는 거리의 곱 사이에 지수적 관계(exponential dependence)를 가지는 걸 알 수 있다.
The law states that there is an exponential dependence between the internal transmittance, T, of light through a volume and the product of the absorption coefficient of the volume, $\sigma_{a}$ (the Greek letter sigma), and the distance the light travels through the material (i.e. the path length).이 계수의 단위는 순환거리 또는 길이의 역입니다. 예를 들어, $cm^{−1}$ 또는 $m^{−1}$이다. 흡수 계수를 임의의 지점/거리에서 임의의 사건이 발생할 확률 또는 가능성으로 간주할 수 있다 (예: 광자가 흡수되거나 산란됨).
The unit of these coefficients is a reciprocal distance or inverse length such as $cm^{−1}$ or $m^{−1}$ (this doesn't matter, it is just a matter of scale). This is important because it helps get an intuitive sense of what information these coefficients hold. You can consider the absorption coefficient (and the scattering coefficient that we will introduce later) as a probability or likelihood if you prefer that a random event occurs (e.g. the photon is absorbed or scattered) at any given point/distance.
The greater the distance or the greater the density the lower the internal transmittance value. Beer-Lambert 법칙에 따라, 빛이 볼륨을 통과할 때, 더 멀리 갈수록 더 많은 빛이 흡수되고, 볼륨의 밀도가 클수록 더 많은 빛이 흡수된다. 이 법칙은 빛의 흡수에 대한 지수적 관계를 설명해주는데, 흡수 계수가 더 높을수록 빛이 볼륨을 통과할 때 더 많은 빛이 흡수되고, 경로 길이가 더 길수록 더 많은 빛이 흡수된다.
The greater the absorption coefficient or the distance, the smaller T. The Beer-Lambert law equation returns a number in the range 0-1. If the distance or the absorption coefficient is 0, the equation returns 1. For very large numbers of either the distance or the density, T gets closer to 0. For a fixed distance, T decreases as we increase the absorption coefficient. For a fixed absorption coefficient, T decreases as we increase the distance. The further light travels in the volume, the more it gets absorbed. The more particles in the volume, the more light gets absorbed. Simple. You can see this effect in Figure 1.Rendering a Volume Over a Uniform Background
두께와 밀도가 각각 10과 0.1인 볼륨의 슬래브가 있을 때, 배경 색 (예를 들어 우리가 보고 있는 벽에서 반사된 빛)이 (xr, xg, xb)이면 볼륨을 통해 본 배경의 색은 다음과 같다:
It's easy to start from here. Imagine we have a slab of volume whose thickness and density are known. Say 10 and 0.1 respectively. Then if the background color (light reflected by a wall for example that we are looking at) is (xr, xg, xb), how much of that background color we see through the volume is:vec3 background_color {xr, xg, xb}; float sigma_a = 0.1; // absorption coefficient float distance = 10; float T = exp(-distance * sigma_a); vec3 background_color_through_volume = T * background_color;Scattering
지금까지 볼륨이 검은색이라고 가정하여 슬래브가 있는 곳의 배경 색을 어둡게 만들었다. 하지만, 볼륨은 고체 물체처럼 빛을 반사(또는 더 정확하게는 산란)하기 때문에, 맑은 날 구름의 모양이 마치 고체 물체처럼 생각할 수 있다. 볼륨은 또한 촛불처럼 빛을 발산할 수 있다. 우리는 이 장에서 빛의 발산에 대해서는 고려하지 않을 것이다. 따라서 볼륨의 슬래브가 특정 색상(yr, yg, yb)을 가지고 있을 때, 볼륨이 빛을 "반사"함으로써 어떤 색을 가지고 있다고 가정할 때, 다음과 같이 코드를 작성할 수 있다:
Note that until now we have assumed that our volume is black. In other words, we just darken the background color wherever our slab is. But the volume doesn't have to be. Volume like solid objects reflects (or scatters more precisely) light too. That's why, when you look at a cloud on a sunny day, you can see the shape of the cloud almost as if it was a solid object. Volumes can also emit light (think of a candle flame) which we are just mentioning for the sake of completeness but we will ignore emission in this chapter. So let's assume our slab of volume has a certain color say (yr, yg, yb). We will ignore where that color comes from for now; we will explain it later in the chapter. Let's just say until then that our volume has some color as a result of the volumetric object "reflecting" light (not really but let's go with the concept of "reflection" like with solid objects for now) that's illuminating it like with solid objects. Then our code becomes:vec3 background_color {xr, xg, xb}; float sigma_a= 0.1; float distance = 10; float T = exp(-distance * sigma_a); vec3 volume_color {yr, yg, yb}; vec3 background_color_through_volume = T * background_color + (1 - T) * volume_color;예를 들어, Photoshop의 이미지 블렌딩은 알파 블렌딩을 사용하여 이미지를 합성하는 과정입니다. 이미지 B를 이미지 A 위에 추가하려고 할 때, A는 배경 이미지(파란색 벽), B는 투명도 채널이 있는 빨간색 디스크 이미지이고, 이 두 이미지를 결합하는 공식은 다음과 같다:
Think of it as the process of blending (A+B) images in Photoshop for example using alpha blending. Say you want to add image B over A, where A is the background image (our blue wall) and B is the image of a red disk with a transparency channel. The formula to combine these two images would be:$$C = (1 - B.transparency) * A + B.transparency * B$$
여기서 투명도는 1 - 투과율(불투명도)이고 B는 볼륨의 색상이다.
Where Transparency here is the 1 - Transmission (also called opacity) and B is the color of our volume object (light that's being "reflected" by the volume and traveling towards our eyes/camera). We will get back to this when we get to the ray-marching algorithm; for now, keep this in mind.Rendering Volume Sphere
첫 번째 3D 이미지를 렌더링하는 데 필요한 모든 것을 갖췄다. 지금까지 배운 것을 사용하여 입자로 채워진 구를 렌더링해보자. 우리는 우리의 구를 배경 위에서 렌더링한다고 가정한다. 먼저 카메라 광선과 구의 교차점을 찾고, 교차점이 없으면 배경 색을 반환한다. 교차점이 있으면 구의 표면에서 광선이 들어오고 나가는 지점을 계산한다. 거기에서, 우리는 광선이 구를 통과하는 거리를 계산하고 Beer의 법칙을 적용하여 구를 통해 전달되는 빛의 양을 계산할 수 있다. 우리는 현재 구에 의해 반사되는 빛이 균일하다고 가정한다. 조명은 나중에 고려할 것이다.
We have all we need to render our first 3D image. We will render a sphere that we assume is filled with some particles using what we have learned so far. We will assume that we are rendering our sphere over some background. The principle is very simple. We first check for an intersection between our camera ray and the sphere. If there's no intersection, then we simply return the background color. If there is an intersection, we then calculate the points on the surface of the sphere where the ray enters and leaves the sphere. From there, we can compute the distance that the ray travels through the sphere and apply Beer's law to compute how much of the light is being transmitted through the sphere. We will assume that light "reflected" (scattered) by the sphere is uniform for now. We will look at lighting later.
Use the intersections points of the camera rays with the volumetric object to compute the opacity of the volumetric object along the camera rays. class Sphere : public Object { public: bool intersect(vec3, vec3, float, float) const { /* compute ray-sphere intersection */ } float sigma_a{ 0.1 }; vec3 scatter{ 0.8, 0.1, 0.5 }; vec3 center{ 0, 0, -4 }; float radius{ 1 }; }; void traceScene(vec3 ray_origin, vec3d ray_direction, const Sphere *sphere) { float t0, t1; vec3 background_color { 0.572, 0.772, 0.921 }; if (sphere->intersect(rayOrigin, rayDirection, t0, t1)) { vec3 p1 = ray_origin + ray_direction * t0; vec3 p2 = ray_origin + ray_direction * t1; float distance = (p2 - p1).length(); // though you could simply do t1 - t0 float tranmission = exp(-distance * sphere->sigma_a); return background_color * transmission + sphere->scatter * (1 - transmission); } else return background_color; } void renderImage() { Sphere *sphere = new Sphere; for (each row in the image) for (each column in the image) vec3 ray_dir = computeRay(col, row); pixel_color = traceScene(ray_orig, ray_dir, sphere); image_buffer[...] = pixel_color; // store pixel color in image buffer saveImage(image_buffer); ... }밀도가 증가함에 따라 투과율이 0에 가까워지므로 볼륨 구의 색상이 배경 색보다 더 두드러집니다. 이는 매우 논리적인 결과입니다.
Quite logically, as the density increases, the transmission gets closer to 0 which means that the color of the volumetric sphere dominates over that of the background.
위의 이미지에서 볼륨이 구의 중심 (광선이 구를 통과하는 거리가 가장 큰 곳)으로 갈수록 더 불투명해지는 것을 볼 수 있고, 밀도가 증가함에 따라 (sigma_a가 증가함에 따라) 구가 전체적으로 더 불투명해지는 것을 볼 수 있다.
You can see in the images above, that the volume gets more opaque towards the center of the sphere (where the distance traveled by the ray through the sphere is the greatest. You can also see that as the density increases (as sigma_a increases), the sphere becomes more opaque overall.Add Light In-Scattering
빛이 볼륨을 통과할 때, 빛의 강도는 볼륨에 흡수되며 약해진다. 볼륨에서 일정 거리를 이동한 후 남아 있는 빛 에너지의 양은 Beer의 법칙에 의해 결정된다. 빛이 볼륨을 통과한 거리를 알고 있다면, 그 거리에서의 강도를 다음과 같이 구할 수 있다:
Let's imagine the fate of light emitted by a light source traveling through the volume. As it travels through the volume, its intensity gets attenuated due to absorption. And not surprisingly enough, how much is left of the light energy after it has traveled a certain distance in the volume is ruled by Beer's law. In other words, if we know the distance light traveled through the volume, its intensity at that distance is:float light_intensity = 10; // just a number, it could be anything float T = exp(-distance_travelled_by_light * volume->absorption_coefficient); light_intensity_attenuation = T * ligth_intensity;먼저, 빛 에너지는 Beer의 법칙에 따라 볼륨을 통과할 때 감소한다. 광원에서 방출된 빛은 산란 효과로 인해 일부 눈으로 들어올 수 있다. 내부 산란은 볼륨을 통과하는 빛이 난반사로 인해 눈으로 향하는 현상을 의미한다. 난반사는 물질을 구성하는 입자/원자와 광자 간의 상호 작용에 의해 나타난다. 이 때, 일부 흡수 또는 반사되지 않은 입자들이 광자를 산란할 수 있다.
So first thing first, light energy decreases as it travels through the volume according to Beer's law. That's pretty logical. But something else also happens: light emitted by a light source that is not initially traveling toward the eye, can also be redirected toward the eye (at least part of it as we will see) as a result of what we call the scattering effect. We speak in this particular case of in-scattering. In-scattering refers to light passing through a volume, that's being redirected toward the eyes due to a scattering event. This effect is illustrated in Figure 4. A scattering event is the result of an interaction between a photon and a particle/atom making up the medium/volume. Rather than being absorbed or reflected (which can happen too), the atom just "spits out" the photon in a direction that's different from its incoming direction. We will learn more about this phenomenon in the next chapters.
Light we are seeing through volumetric objects comes from the background objects (here the blue color) as well as from light sources. Even though light beams when emitted by the light source are not traveling to the eye, some quantity of light is being redirected to the eye as it passes through the volumetric object due to the in-scattering effect. 위의 그림을 보면, 그림에서 파란색으로 표시된 특정 눈/카메라 광선을 따라 눈에 도달하는 빛은 배경(우리의 파란색 배경)에서 오는 빛과 내부 산란으로 인해 눈으로 향하는 광원(노란색 광선)의 조합이다.
If you look at the above figure, note that light that arrives at the eye (along the particular eye/camera ray that is drawn in blue in the figure), is a combination of light coming from the background (our blue background) and light coming from the light source scattered towards the eye due to in-scattering (the yellow ray).
We need to integrate the light that's be redirected towards the eye due to in-scattering along the segment of the ray that passes through the volumetric object. 광원의 영향을 어떻게 알 수 있을까? 우리는 카메라 ray 뿐만 아니라 내부 산란의 효과로 눈에 들어오는 빛을 측정해야 한다. 문제는 위 그림과 같이 카메라 광선이 구와 교차하는 전체 부분에 걸쳐 그 효과를 고려해야 한다는 것이다. 우리는 카메라 광선에 따라 내부 산란되는 빛을 $t_{0}-t_{1}$ 범위에서 적분해야 한다.
So how do we account for the contribution of a light source? We need to "measure" light that's being scattered towards the eye (along with the camera rays) as the effect of in-scattering. The problem is that we need to account for that effect along the entire part of the camera rays that are intersecting the sphere (Figure 5). We need to "integrate" light that's being in-scattered along the camera ray, over the range t0-t1.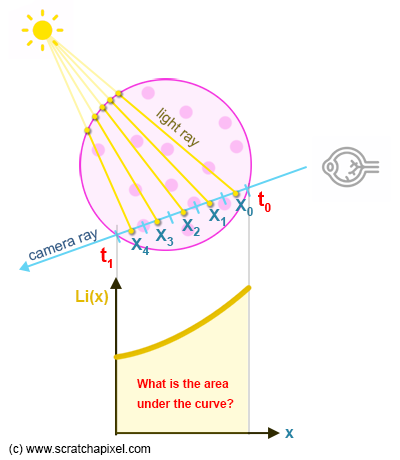
Marching along the ray in regular steps to estimate our integral using a Riemann sum. 이 문제를 해결하기 위해, 볼륨을 통과하는 카메라 광선의 부분을 특정 개수의 세그먼트(샘플)로 나누고 다음 과정과 같이 각 세그먼트(샘플)의 중심에 얼마나 많은 빛이 도달하는지 계산한다:
To solve this problem, we will divide the section of the camera ray that's passing through the volume into a certain number of segments (our samples if you wish) and compute how much light arrives at the center of each one of these segments (sample) using the following procedure (see Figure 6 for a visual representation of the concept):- 그 샘플 지점(X라고 부름)에서 광원쪽으로 광선을 쏘아 샘플 지점과 구 경계 사이의 거리를 계산한다(이 지점을 P라고 부름). X는 항상 구(우리의 볼륨) 내부에 있고 P는 항상 구 표면의 한 점이다.
We shoot a ray from that sample point (let's call it X) toward the light source to compute the distance from the sample point to the sphere boundary (let's call this point P). Note that X is always inside the sphere (our volume) and P is always a point on the surface of the sphere. - Beer의 법칙을 적용하여 빛 에너지가 P(이 광선이 구에 들어간 지점)에서 X(눈 광선의 지점으로 이 광선이 관찰자쪽으로 산란된 지점)로 이동하는 동안 얼마나 약해졌는지 알 수 있다.
Then apply Beer's law to know by how much the light energy was attenuated as it traveled from P (the point where this light ray entered the sphere) to X (the point along the eye ray where this light ray was scattered towards the viewer).

We can estimate the area under the curve that represents the amount of light scattered along the camera using a Riemann sum. The idea is to break the area under the curve into a sum of small rectangles. The height of each rectangle is given by Li(x) and the width, dx, is user defined. 여기서 해결하고 있는 문제의 유형을 이해하려면 위의 2개의 Figure를 살펴봐야 합니다. 위의 그림은 카메라 광선에 따라 도착하는 들어오는 빛을 보여준다. 그림의 하단 부분에서 볼 수 있듯이, 이것은 연속 함수이다. 이 함수를 Li(x)라고 할 때, x는 카메라 광선의 $t_{0}-t_{1}$ 범위에 포함된 임의의 지점이다. 우리가 계산해야 하는 것은 곡선 아래의 면적이다. 해당 수식을 다음과 같이 표현할 수 있다:
To understand the type of problem we are solving here, we need to look at Figures 6 and 7. Figure 6 shows the incoming light arriving along the camera ray which, as you can see in the bottom part of the figure, is a continuous function. Let's call this function Li(x) where x here is any point along the camera ray contained within the range t0-t1. What we need to compute is the "area" below the curve. In mathematics, it is an integral that we can write as:\begin{equation} \int_{x = t_{0}}^{t_{1}} Li(x) \, dx \end{equation}
적분의 결과는 위의 그림에 표시된 바와 같이 곡선 (함수 $Li(x)$) 아래의 (순 signed) 면적으로 정의된다. 우리 경우에는 이 면적을 분석적 해법을 사용하여 계산할 수 없다. 하지만 더 간단한 도형인 직사각형의 면적을 알고 있으므로 이를 분해하여 이 면적을 근사화하는 트릭을 사용할 수 있다. 우리는 곡선의 규칙적인 간격으로 Li(x)를 샘플링하고 그 너비 (dx)를 알고 있으며, 결과 직사각형의 면적은 Li(x)를 dx로 곱하여 계산할 수 있다 (x는 간격의 중간에 있습니다). 모든 직사각형의 면적을 합하면 곡선 아래의 면적의 근사값을 얻을 수 있다.
As we just said, the result of an integral (which is a number) is defined to be the (net signed) area under the curve (the function Li(x)) as illustrated in Figure 6. The problem in our case is that we can't compute this area using an analytical solution. But we can use a trick to approximate this area by breaking it down into simpler shapes we know the area of rectangles (as shown in Figure 7). We sample Li(x) along the curve at regular intervals which we know the width of (dx) and the area of the resulting rectangle can then be computed as Li(x) multiplied by dx (x is in the middle of the interval). By summing up the area of all the rectangles, we get an approximation of the area under the curve. Et voila! This technique is known as the Riemann sum (the idea of approximating a shape whose area we don't know with areas we do know goes back to the Greeks).참조:
Volume Rendering for Developers: Foundations
Volume rendering (technically, using the term participating media instead of the term volume would be better) is a topic almost as large and as complex as hard surface rendering. It has its own set of equations which are in fact, almost a generalization of
www.scratchapixel.com
- 그 샘플 지점(X라고 부름)에서 광원쪽으로 광선을 쏘아 샘플 지점과 구 경계 사이의 거리를 계산한다(이 지점을 P라고 부름). X는 항상 구(우리의 볼륨) 내부에 있고 P는 항상 구 표면의 한 점이다.